
Cert Manager
 Cert Manager is a native Kubernetes certificate management controller.
It helps with issuing certificates from Let’s Encrypt and others. In this step we will install Cert Manager
and configure it for certificate acqusition and renewal with
Cert Manager is a native Kubernetes certificate management controller.
It helps with issuing certificates from Let’s Encrypt and others. In this step we will install Cert Manager
and configure it for certificate acqusition and renewal with  LetsEncrypt.
NOTE: Before you proceed you need a domain that you own. In this tutorial we use ‘homekube.org’
Benefits are:
- Obtaining LetsEncrypt certificates
- Provision of a wildcard certificate for a domain and all of its subdomains
- Automated certificate renewal
Cert-Manager Kubernetes provides an integrated open source solution that does this (and much more).
The common term for the method we use is ACME/DNS01 provider where ACME stands for ‘Automated Certificate Management Environment and
DNS01 is the method by which LetsEncrypt validates ownership of a requested validation for a wildcard domain.
Read more about Letsencrypt challenges and the DNS01 challenge type
Preparation
Prerequisites are:
- A domain you own, e.g. homekube.org, example.com, yourdomain.org, …
NOTE that we don’t need ingress being configured as long as we only care about ACME/DNS01 configurations explained here. We need access to our DNS service provider to perform the acme challenge handshake to prove the domains ownership. (See below).
Execute
cd ~/homekube/src/cert-manager
Installation
Following the Cert-Manager installation instructions:
kubectl apply -f https://github.com/cert-manager/cert-manager/releases/download/v1.15.1/cert-manager.yaml
kubectl get pod -n cert-manager --watch
The containers are getting up and running:
NAME                                      READY   STATUS    RESTARTS   AGE
cert-manager-7747db9d88-cd7xz             1/1     Running   0          3m57s
cert-manager-cainjector-87c85c6ff-s8m9g   1/1     Running   0          3m57s
cert-manager-webhook-64dc9fff44-bl64h     1/1     Running   0          3m56s
Its recommended to verify the installation .
Configuration of Helpers
While Cert-Manager cares about automated renewal and integration of the certificates on the kubernetes level
its not able to communicate with LetsEncyrypt services directly. Instead it delegates this task to its
ACMEDNS adapter
which in turn makes use of another helper service.  Acme-dns
is a basic DNS server that acts on behalf of your providers DNS service for the sole purpose of renewing LetsEncrypt certificates.
Acme-dns
is a basic DNS server that acts on behalf of your providers DNS service for the sole purpose of renewing LetsEncrypt certificates.
 Learn more about the principles of operation
ACME-DNS
The author of Acme-dns recommends you install your own helper service (official terminology
CertBot client)
which can be done following the usage instructions.
While its generally advisable to be in control of this component we will take the short-path here and use a public service
located at https://auth.acme-dns.io
NOTE: You need to be aware that this component is cruicial for automated updates and we have to trust the provider for confidentiality. In case the provider terminates its services or he loses your registration data then the automated renewal gets terminated and needs to be reconfigured
Service usage is a 2 step process. First we will register at the service manually and its response data is then used for automated updating.
Registration
Next we will register at the service manually:
# jq . is just for readability and can be omitted
curl -s -X POST ${HOMEKUBE_CERT_URL}/register | jq .

# if jq is not installed you might install it with suddo apt install jq. It just helps readability and can be ommitted at all.
A random response will be generated. Example:
{
    "allowfrom": [],
    "fulldomain": "84bba6b0-b446-42ff-8d22-11b27f4ff717.auth.acme-dns.io",
    "password": "mPSNztp-s_m2atJtT8wapPQ7Z4AIIyE4i5H7fQas",
    "subdomain": "84bba6b0-b446-42ff-8d22-11b27f4ff717",
    "username": "81bbffed-f46c-43e5-997e-777e8ab1298f"
}
Updating
We will use the response as input for configuration. First we need to update our DNS providers CNAME settings
with the fulldomain value of the response. _acme-challenge.yourdomain.tld is the key required by LetsEncrypt.
In common bind notation we’d define
_acme-challenge.homekube.org IN CNAME 84bba6b0-b446-42ff-8d22-11b27f4ff717.auth.acme-dns.io.
NOTE: As a CNAME value you have to copy the “fulldomain” property value terminated by a dot . !
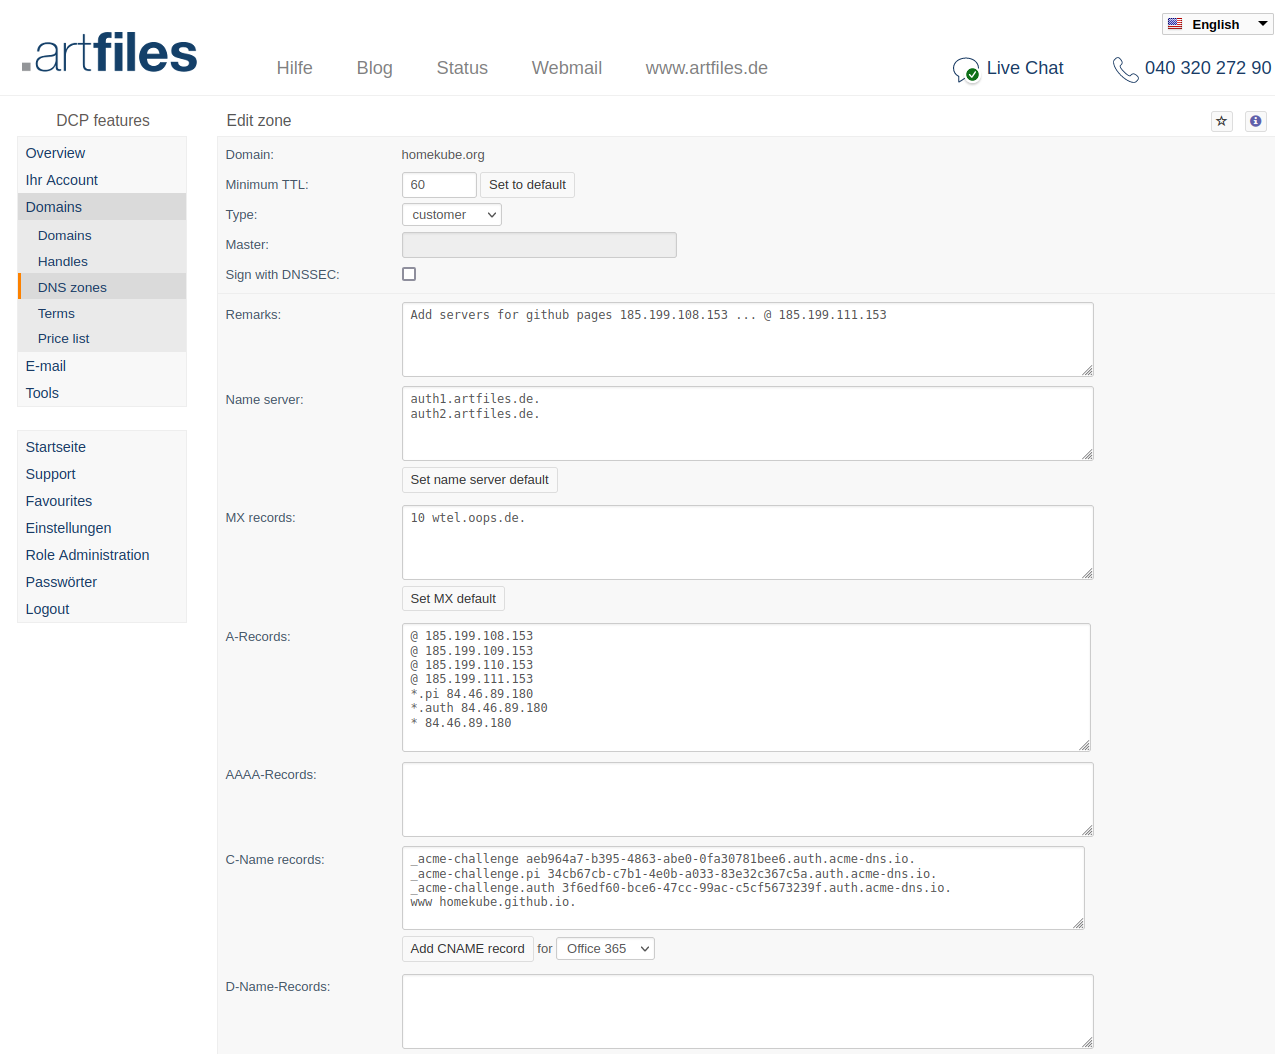
Usually you have to use your dns providers console or webinterface for that. Homekube’s DNS host is Artfiles.de and screenshots of the dns webinterface modifications #1 #2 (with Github pages and pi subdomain) is provided as a reference.
Note again the trailing dot . !
Next we’ll check (a google nameserver) if configuration was successful
dig @8.8.8.8 _acme-challenge.homekube.org
The response will contain a line like
;; ANSWER SECTION:
_acme-challenge.homekube.org. 599 IN	CNAME	84bba6b0-b446-42ff-8d22-11b27f4ff717.auth.acme-dns.io.
On success the CNAME is the fulldomain line of the generated registration response above.

 4:15 Acme-Dns manual update demo
Next we follow the
ACME-DNS configuration instructions
and save the registration response into a .json file acme-dns-homekube-org.json on the server in your current directory
with the domain name as a key and the response as its value.
Replace homekube.org part with ${HOMEKUBE_DOMAIN}
Example acme-dns-homekube-org.json looks like:
{ "homekube.org":
  {
    "allowfrom": [],
    "fulldomain": "84bba6b0-b446-42ff-8d22-11b27f4ff717.auth.acme-dns.io",
    "password": "mPSNztp-s_m2atJtT8wapPQ7Z4AIIyE4i5H7fQas",
    "subdomain": "84bba6b0-b446-42ff-8d22-11b27f4ff717",
    "username": "81bbffed-f46c-43e5-997e-777e8ab1298f"
  }
}
Configuration Cert-Manager
Now that we have the helpers in place we need a last step to complete the installation. First lets create a secret from the previously saved registration response.
## env vars should already exist - if not create them
#export HOMEKUBE_DOMAIN=homekube.org
#export HOMEKUBE_DOMAIN_DASHED=${HOMEKUBE_DOMAIN//./-}  # all dots in domain name are replaced by dashes to comply with rfc requirements
#export HOMEKUBE_CERT_URL=https://auth.acme-dns.io

kubectl create ns cert-manager-${HOMEKUBE_DOMAIN_DASHED}
kubectl create secret generic acme-dns-secret -n cert-manager-${HOMEKUBE_DOMAIN_DASHED} --from-file=acme-dns-secret-key=acme-dns-${HOMEKUBE_DOMAIN_DASHED}.json
envsubst < staging-template.yaml | kubectl apply -f -
Lets verify our installation
kubectl describe secret tls-staging -n cert-manager-${HOMEKUBE_DOMAIN_DASHED}
should evaluate to
Name:         tls-staging
...
Type:  kubernetes.io/tls

Data
====
ca.crt:   0 bytes
tls.crt:  3562 bytes
tls.key:  1679 bytes
The important part here is that both tls.crt and tls.key must be present and not empty.
This may take a while until the tls.crt is present and its size is > 0 !.
In case of errors check cert-manager logs to see the progress
export POD_NAME=$(kubectl get pods --namespace cert-manager -l "app=cert-manager,app.kubernetes.io/component=controller" -o jsonpath="{.items[0].metadata.name}")
kubectl logs $POD_NAME -f -n cert-manager
and follow the troubleshooting steps.
Note that you need to append all commands with ` -n cert-manager-acme-secrets` as thats the namespace that we use
for the Certificate. The same namespace will be used for all child resources as secrets, certificaterequests, orders, … .
If everything goes well we can obtain the ‘real’ certificate form LetsEncrypt production endpoint. LetsEncrypt has quite
restricitve rate-limits about the usage
of its production endpoint so you better double-check with the staging-endpoint.
The production manifests are the same as staging except that:
- the acme server endpoint
https://acme-staging-v02.api.letsencrypt.org/directory
is replaced byhttps://acme-v02.api.letsencrypt.org/directory - all other occurrences of
stagingare replaced byprod
envsubst < prod-template.yaml | kubectl apply -f -
Be patient It may take a couple of minutes until the tls-prod secret becomes available in the namespace.
The option --watch monitors the namespace.
root@homekube:~/homekube/src/cert-manager# kubectl get secrets -n cert-manager-homekube-org --watch
NAME                      TYPE                DATA   AGE
acme-dns-secret           Opaque              1      3m40s
cert-issuer-account-key   Opaque              1      3m39s
tls-staging               kubernetes.io/tls   2      2m33s
tls-prod                  kubernetes.io/tls   2      9s
Check the resulting secret
kubectl describe secret tls-prod -n cert-manager-${HOMEKUBE_DOMAIN_DASHED}
contains non-empty tls.crt and tls.key you are done
Updating Ingress
Finally we will update our Ingress configuration to take advantage of our certificates. The simplest solution is to update Ingress controllers deployment to use our fresh certificate by default:
The kubectl patch command adds the certificate to the controller:
kubectl patch deployment "nginx-helm-ingress-nginx-controller" \
    -n "ingress-nginx" \
    --type "json" \
    --patch '[
      {"op":"add","path":"/spec/template/spec/containers/0/args/-",
      "value":"--default-ssl-certificate=cert-manager-'${HOMEKUBE_DOMAIN_DASHED}'/tls-prod"}]'
Check patch validity
EDITOR=nano kubectl edit deployment.apps/nginx-helm-ingress-nginx-controller -n ingress-nginx
That command opens an editor with lots of deployment configuration and we scroll down and look for the commands that configure the arguments of the controller:
...
    spec:
      containers:
      - args:
        - /nginx-ingress-controller
        - --publish-service=ingress-nginx/nginx-helm-ingress-nginx-controller
        - --election-id=ingress-controller-leader
        - --ingress-class=nginx
        - --configmap=ingress-nginx/nginx-helm-ingress-nginx-controller
        - --validating-webhook=:8443
        - --validating-webhook-certificate=/usr/local/certificates/cert
        - --validating-webhook-key=/usr/local/certificates/key
        - --default-ssl-certificate=cert-manager-homekube-org/tls-prod
...
If patch did work as expected there should be an additional container argument with correct indentation:
- --default-ssl-certificate=cert-manager-acme-secrets/homekube-tls-prod.
The code snippet above already shows the final result. If this line does not exist so just add it as above.
Now saving the editor will immediately activate the updated configuration.
Open a browser on any of the supported subdomains, e.g. https://dashboard.homekube.org.
There security warning has gone as we have provided a valid certificate !
Troubleshoot failed renewals
Once in a while cert-manager fails to update. Excerpt from the logs:
I0209 06:06:15.819563       1 controller.go:141] cert-manager/controller/certificaterequests-issuer-acme "msg"="syncing item" "key"="cert-manager-acme-secrets/homekube-certificate-prod-2758539001"
E0209 06:06:15.820924       1 sync.go:136] cert-manager/controller/certificaterequests-issuer-acme "msg"="error issuing certificate request" "error"="found Order resource not owned by this CertificateRequest, retrying" "related_resource_kind"="ClusterIssuer" "related_resource_name"="letsencrypt-prod" "related_resource_namespace"="" "resource_kind"="CertificateRequest" "resource_name"="homekube-certificate-prod-2758539001" "resource_namespace"="cert-manager-acme-secrets"
E0209 06:06:15.821051       1 controller.go:143] cert-manager/controller/certificaterequests-issuer-acme "msg"="re-queuing item  due to error processing" "error"="found Order resource not owned by this CertificateRequest, retrying" "key"="cert-manager-acme-secrets/homekube-certificate-prod-2758539001"
It seems that auto cleanup of failed requests does not work properly in all cases.
This issue comment helped to solve the problem
# List all custom resource definition
kubctl get crd
# We are interested in orders and certificaterequests
kubectl get orders -A
kubectl get certificaterequests -A

# Delete suspicious entries e.g.
kubectl delete certificaterequest homekube-certificate-prod-xxxx -n cert-manager-acme-secret
kubectl delete order homekube-certificate-prod-xxxxxx-yyyyyyy -n cert-manager-acme-secrets